(Photo taken from Lostseason3.blogspot.com)
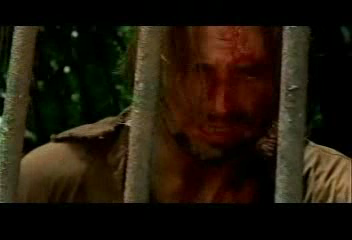
It's easy to think a Sawyer-centered episode entitled "Every Man for Himself" will continue to reveal James Ford as the selfish con man we've all come to know and love. As it turns out, the title is ironic - Sawyer's use of the titular cliche was not to justify his screwing over a fellow crash survivor, but rather to try to convince Kate to escape the zoo-as-jail the two budding lovers have been placed in, leaving him behind. But that's the "present" - as always, we begin in the past.
Lest we think James always got away with everything he set his greedy mind to before flight 815 crashed, we now know he spent at least one nine-month stint in the pokey (kudos to anyone who may have caught a C.O. shoulder patch revealing where Sawyer was incarcerated - I did not). Sawyer's flashbacks reveal that his conning of Cassidey Phillips' nest egg in last season's episode, "the Long Con" did not end the way we thought it did. Sawyer was caught, Cassidey pressed charges, and off to jail it was! This week's flashbacks took place 9 months into a 15-month sentence, where prisoner number 840 finds himself visited by Cassidey. She showed him a photo of a baby (nine months, get it?), and told him it's his daughter, Clemontine, who Cassidey is raising alone in Albuquerque. She asked James to write to his daughter, but, realizing parenthood was not what he had in mind for his life, James refused.
While in the slammer, Sawyer encountered a prisoner named Munson (prisoner number 248) who stole $10 million from the government. The prison's warden (played by the always intimidating Bill Duke) had been setting up beatings for Munson, only to arrive at the right moment to have his C.O.'s break it up. Sawyer swooped in and, taking time off from reading "Of Mice and Men," took Munson under his wing, convincing him the warden was trying to con him into giving up the $10 million, and that his next move would be to turn Munson's wife against him. Sure enough, on the same visiting day when James learned about Clemontine, Lila Munson tried to get her husband to cough up the location of the loot. Scared that eventually either he would crack or the warden would find it some other way, Munson gave up the location (it's in unit 23C!) and begged Sawyer to move it to keep it safe. As we learn by episode's end, however, Sawyer, the warden and the U.S. Treasury department had been working together. In exchange for conning Munson out of the location, Sawyer would be set free 6 months early, and the government would pay him a "commission," to boot. But in very un-Sawyer-like fashion, James requested that the money be paid into a bank account in Albuqurque in Clemontine's name, and that she never be allowed to discover where the money came from.
As we learn back on the island, such noble, self-sacrificing behavior is something Mr. Ford actually has hidden away in his character. Ben scares the pluck out of Sawyer by making him think any trouble on his part will result in a ticking time bomb being implanted in Kate's heart. Not wanting to risk his precious "Freckles," Sawyer clams up on her (he now knows they're being watched in their cells), and tries to convince her 1) not to attempt to escape, and 2) once free from her cage, not to try to free him. "It's every man for himself, Freckles" is his lame attempt to convince her to run and leave him behind, but her response, the title of last season's finale - "live together, die alone" - tells him that ain't about to happen.
But again, we're getting out of order. There were a number of reveals and teases in this episode. Back on the beach, Desmond seems lost in thought. At first it seems he just wants to fit in. He offers to fix Claire's roof (which appears fine, as tarp-hut roofs go), only to have Charlie pop up to beat his chest and defend his territory. Desmond then approches new guy Paolo, who is driving small fruits into the ocean with a set of golf clubs, and asks to borrow one. Paolo makes a snide comment that Desmond should take the 5 iron, since he never uses it and that way he won't have to go looking for it when Desmond gets killed doing "whatever" in the jungle. Desmond snags the 5, then offers Paolo some advice on his golf swing, because, "I'm Scottish." Later, Desmond builds a strange structure out of bamboo, some cabling and the five iron. He prompts Hurley to watch the structure, which sits next to Claire's tent, as rain begins to fall. Suddenly, a bolt of lightning strikes Tower of Hume, which topples harmlessly to the sand in flame. This whole sequence seemed a little confusing; my take is that Desmond had another clairvoyant flash - he knew lightning would strike at Claire's tent and that her roof would then need repair. Realizing it was still fine, he instead built the lightning rod to change the vision he had - and apparently succeeded. Please let me know if any of you read this differently...
Despite the interesting flashback and the glimpse at Desmond and the beach camp, this episode really lived, as the best moments of Season 3 have so far, at the Hydra installation. Jack, tired of the cartoons being played on the tv monitor outside his cell, asks Juliet if he should talk to Benjamin to find out what the Others want him to do in exchange for their promise to return him home, since she's telling him nothing and she clearly reports to Ben. He's using the same divide-and-conquer technique Ben used last season on Jack and Locke (of course, it only seemed to get Ben tortured). Juliet denies reporting to Ben and says that's not how things work in Otherville...just in time for Ben to show up and bark an order at her which she must follow. He tells her the "sub" is back and there's been an incident, and she's needed. A sub? Was that a cleverly-inserted bit of misdirection for Jack's benefit? Or does that explain how the Others bypassed Sayid's trap to shanghai the Elizabeth? But if they have a sub, why did they need a sailboat?
In any case, we soon learn the icident Ben is talking about is the gunshot wound Colleen sustained from Sun in the galley of the Elizabeth. Ben and Juliet rendezvouz with Danny Pickett, the work detail leader who was on his way to fetch Sawyer and Kate from their cages, and together they meet up with Tom's boarding party, who are carrying Colleen back on a stretcher. Danny sees his wife (yes, we learn they're married) in pain and runs off to assist. It horrifies Kate when she sees Sawyer smiling at Colleen's wound, but he explains to her that the Others don't go shooting each other; rather, "we did it - our team." Sawyer now knows the other crash survivors are still out there and still fighting.
Sawyer hatches another plot, using the fish biscuit/ electrocution apparatus in his cell. He generates enough runoff from his water spigot to leave a puddle outside his cell, and plans to grab an Other guard who inadvertently steps in the puddle, and then shock the guard by using the shock mechanism in his cage. Unfortunately, Sawyer explains this to Kate, still unaware they're being monitored. He learns the error of his ways when Ben comes to take him away, the shock mechanism fails (as Ben tells him, "we turned it off"), and Ben proceeds to give Sawyer a pretty righteous beat-down. Sawyer finds himself on a lab table, strapped down, chest exposed, with a bit of rawhide shoved into his mouth "for the pain." A few subtle things happen as Ben's crew proceeds to ram a long needle through Sawyer's sternum into his heart. First, Tom reveals that the Others' communication system has apparently been on the fritz since the purple lights emanated from the Swan Hatch failsafe mechanism. Second, in another subtle reveal (I think, anyway), Ben comments "I hate needles," again suggesting he once spent time as a prisoner in this facility. And third, the allegedly defunct squawk box marked "communicate" in Jack's cell starts transmitting Sawyer's screams of terror. (I could not make out the later transmission Jack picked up last night. Any help from the peanut gallery on this?)
Sawyer soon awakens to find a small bandage and large bandage, both on his chest, and Ben standing over him with a white bunny painted with a figure 8 (the numbers do seem to be popping up all over the place this year, eh?). Ben shakes the bunny cage until the rabbit suddenly lies down and stops moving altogether. He explains to Sawyer that a pacemaker has been installed in both him and the rabbit. The rabbit got too excited, and the pacemaker made his heart explode. The same would happen to Sawyer if he every got his heart rate above 140. What's more, if he ever tells Kate that the cages are under surveillance or what had been done to him, they would do the same to her. That Sawyer has been conned becomes apparent to us before it is to him, when Juliet, wearing bloodied white scrubs with a hydra station logo, tells Jack the blood is not Sawyer's and that they did nothing to Sawyer. However, she needs his help treating a gun shot victim, whose blood she has all over her. Since Jack is the doctor who needs to fix things, he agrees, and is taken with a sack over his head to whatever location Colleen is lying in. Along the way, he is marched past the cells in which Sawyer and Kate sit. Alarm claxons are sounded to prevent him from hearing them call his name; however, a momentary pause as he walks by suggests he did hear their calls. In other words, the three of them now know they're all still alive.
Once the hood is off, Jack starts to scrub in. He notices some x-rays but Juliet says those are someone else's. Jack recongizes the x-rays as depicting a spinal tumor on a 40-ish male (there is also a logo I don't recognize - it looks like an "RO," but with two dots in the one and two o'clock positions in the O). Jack springs into action to try to save Colleen. Danny at first is clearly not pleased, asking Ben "how could you bring him here?" but Ben calms him. Unfortunately, Colleen flatlines, and when Jack asks Juliet for a crash cart, she tells him their's is broken (another after effect of the Swan detonation?). Colleen dies, and Danny is less than pleased.
Danny storms out to the cages, pulls Sawyer from his, and proceeds to beat him pretty badly. Sawyer can't fight back, for fear of having his heart explode. Danny shoves Sawyer against the bars of Kate's cage and starts punching furiously. He snarls at Kate, "do you love him?" after each punch until, frantically, she clutches Sawyer through the bars and cries, "yes, I love him." Danny puts Sawyer back in his cage. Kate decides it's time to test a theory she developed earlier. Remarkably easily, she climbs to the top of her cage and slips between two bars. As she attempts to free Sawyer, he begs her to leave him behind (the "every man for himself" exchange). She can see through him when he won't explain to her why he wouldn't fight back, what they had done to him, or why he won't try to escape now. He goes to the well and tells her, "if you really love me, you'll run." Realizing the depth of his feelings for her, Kate's initial response is to say "I only said that so he'd stop hitting you." Was this a rejection, or are the sparks not really there, after all? Rather than run, however, Kate proceeds to climb back into her cage.
The scene is monitored by Ben and Tom. Tom tells Ben that Danny wants to kill Sawyer. Ben's response, "Danny can wait," seems ominous for reasons we don't yet fully understand. Tom asks if it's time to bring Jack back, and Ben says he wants to "leave him with her for a while." It seems, after Colleen died, Jack was handcuffed to the hospital bed on which she lay, and was left alone with the corpse. When Juliet returns to uncuff him, she apologizes and reveals that she is a fertility doctor, not a surgeon (at least we've confirmed she's a doctor, as Jack had suspected). He lets her know what he observed on the x-ray, and asks who it is the Others want him, the reknowned spinal surgeon, to save.
In the last scene of the episode, Ben and some armed Others escort Sawyer from his cell. Sawyer quotes from "Of Mice and Men," and, when Ben doesn't seem to know the quote, Sawyer tells him, "you'd like it - puppies get killed." As Ben leads him up a steep hillside, the pulse montior they gave Sawyer starts to beep, his heart rate now up to 135. When he asks if they're trying to make his heart explode, Ben tells him "the only thing we put in you was doubt" and pulls out what appears to be the same bunny, with the same "8," still alive. Ben tells Sawyer they only sedated the bunny, but Sawyer is not convinced they didn't just paint another 8 on another rabbit bum (after seeing "The Prestige," I'm nor sure I am, either). Sawyer plants what appeared to be a very satisfying punch on Ben's jaw when Ben comments that the most interesting thing about Sawyer's reactions was that the threat to Kate seemed to move him more than the threat to himself. Ben tells Sawyer "the only way to gain a con man's respect is to con him," and goes on to say, in another moment of pure Michael Emerson creepy, "you're pretty good, Sawyer. We're better." Ben then shows Sawyer that the hydra station is, in fact, on another island, too far removed from the survivors' beach to be accessible, but close enough to see across the water. In other words, even if they get out of the cages, there is no escape. More to the point, it seems rather unlikely the 815 survivors will find them (especially now that they lack a boat), even if they go looking (though I suppose they may still find Otherville in the northern portion of their main island).
So now there are two islands (making it somewhat less plausible that nobody in the outside world can find them). If you're wondering how the polar bears got from Hyrda to crash site, (pause to put on the geek hat), bear in mind that ursus maritimus, or "sea bears" are excellent swimmers.
As a parting thought this week, given how frequently master con-man Sawyer gets conned on Lost, I can't help but wonder if revenge-seeking Cassidey made up Clemontine to try to con the man who stole her heart out of some of his more recent scratch. Only time and future flashbacks will tell...
Next week, the internet buzz tells us a favorite character may die, or otherwise disappear for awhile, and Locke brings some fellow survivors to the Pearl hatch, where they see a strange figure on one of the monitors, all on the Eko-centered episode entitled "the Cost of Living."


4 comments:
Excellent summary as usual.
I agree with your interpretation of Desmond's project and Claire's roof. I think Desmond did build the golf club lightning rod to protect Claire, Charlie and Aaron, and I think (based on Charlie's expression afterward) that that was clear to Charlie as well.
The new guy Paolo is apparently a coward and a jerk.
It's also fairly clear that the reason the Others needed to steal the boat from the Losties is so that they couldn't get to Other-Alcatraz, although it begs the question of whether Desmond ever saw the other island in his attempts to escape.
This was an interesting character episode, all in all, but mildly disappointing in its failure to really move the plot along, especially with only 2 more episodes to go to conclude the first part mini-season.
Also, to answer your question, I suspect that Sawyer was incarcerated in Florida, since he said that Munson's loot was hidden somewhere around Sawgrass and 441, which are Florida roads.
- Sinai
Very good recap! I loved this eppy as much as the 3rd one. Lovin' The Des a LOT.
My take on the "Tower of Hume" is that Desmond saw that Claire's tent was going to be hit by lightning and possible injury to her and/or Aaron so that's why he asked her to move (using the aliby that her roof needed repair then). Since she wouldn't move, he had to divert the lightning and did so with the tower & 5 iron.
Jane
www.lostdesmond.com
Hey, Jane, welcome aboard. Cool Desmond site you got there! How did you find my little slice of the blogosphere? I can't find the page on any search engines, and I run it! It's looking like you, me, Sinai and a few other internet postings (not the least of which is ABC and American Express's "Lost and Found) seem to agree with us. Maybe we should just track down Desmond and ask him what's going to happen down the pike on the show...
Very nice blog and recaps!
I didn't post this on the correct entry and could not delete it, so here goes again.
I also think that it's a possibility that Desmond was just trying to get Claire and Aaron moved out of their tent on the pretext of the bad roof, so that they would not be there when the lightening hit. After her moving didn't happen, thanks to Charlie's jealousy, Des made the lightening rod instead to deflect the strike from Claire's tent.
As for Ben not liking needles, he would not necessairly have to have been a prisoner or captive of the DI. Those DI kooks so much like to play doctor on everything and everyone, as we learned this summer during TLE, it's a good chance that if you spent a lifetime with the DI, you would have been probed and prodded by them just in the course of your life with countless tests and vaccinations. :-(
Post a Comment